What is Heat Treatment?

Most people think of heat treatment as a process for hardening metal. This is not necessarily so. Many heat treatments are applied to soften metal allowing for different applications.
Why heat treat steel?

Steel is heat treated when increased strength and wear resistance is required. It is an optional added process to optimise the mechanical and physical properties of the steel for a given application.
Steel has a hard surface (outer skin layer) with a softer inner core. This is known as being ductile. The carbon content within the steel allows it to be heat treated to make it harder than its annealed form (the hardness at which it is supplied).
When is it best to heat treat steel?

The heat treating of steel is done when the steel is too soft to use for a specific application that requires it to be harder than its supplied state.
An example of this is a screwdriver blade, which must be harder than the shaft or the blade will bend or shear, but the shaft can also bend if it’s left in its annealed state, being too soft and making it unfit for purpose.
What steels can be hardened?

Steel, to be successfully hardened, needs to have a carbon content of about 0.6 percent or more. Medium to high carbon steel has sufficient carbon content (0.6% plus) to allow it to be hardened.
Extremely hard steels, such as heat treated stainless and tool steels, are used for cutting tools where highly defined edges must be maintained and heat treatment of these steels is a critical operation. The heat-treating process is usually done in three stages: hardening, annealing and tempering.

When heat treating tool steel grades, consideration should be given to hardening temperatures, including rate of heating, cooling and soaking times which will vary due to factors such as the shape and size of each component.
Hardening

Step 1: Heat the Steel
The temperature at which the steel is heated for hardening purposes depends upon the type of steel. For high carbon steels, this tends to be a cherry-red colour.
A good indication that it is at the required temperature is taken from a glow chart. For example, 780 degrees C is the elevated temperature for hardening certain tool steels and will be close to a bright red.

If excess heat is applied, say to a white hot, this is then at its critical temperature – the temperature at which it remains in its solid state. Increasing the temperature above its critical state will result in the metal starting to spark and show signs of melting, which has to be avoided.
A good way of testing whether or not the steel is at the correct temperature prior to quenching (the second process to hardening) is to see if a magnet still attracts to it – once the magnet doesn’t attract to the heated steel anymore, it is ready for quenching.

Heat the tool steel slowly to 760 – 815°C, using the upper end of the temperature range for lower carbon contents and lower end of temperature range for higher carbon contents. Heat the entire piece of steel slowly at first.
Then, concentrate the heat on the area that is to be hardened, such as a chisel point or screwdriver blade tip, until that area glows red hot. For silver steel, concentrate heat in the area to be hardened until between a dull and bright red colour.
Step 2: Cool the Steel

It is then put in water or oil to rapidly cool it again. This process is known as quenching. The work piece must be quenched vertically and moved in a figure of eight and not just held still in one place to maximise cooling.

Caution: If you quench your work piece horizontally, it can warp (bend) and distort due to one side of the workpiece rapidly cooling quicker than the other.

Dipping the hot steel into a liquid such as water rapidly cools it, hardening the metal. Several fluids may be used as a quench but water or brine (salt water) are the most common outside of the work place.

Water can reach boiling temperature very quickly which can be detrimental to the cooling process. If bubbles are allowed to form, they can slow the cooling process and create soft spots in the metal, so water is usually agitated (constant flow of water through quench area) to take heat away and provide a constant temperature (approx.15 degrees C) and prevent bubbles from forming.
Salt water quenches hot steel faster than fresh water because the salt makes bubbles pop faster and it has a higher boiling point unlike fresh water.

Salt water must be rinsed off immediately though because it will corrode steel faster than fresh water.
Quenching in water or brine makes the steel harden more than if quenched in oils. If a reduced hardness is sufficient, then quenching in oil makes the cooling process marginally longer and the steel will be less hard. The harder the steel, the more brittle and likely it is to break.

Image Credit: Enrique Rocha-Rangel
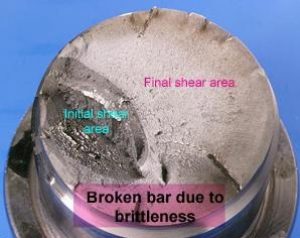
Heating to critical temperature, then immediately quenching in water, allows for maximum hardness of the steel. However, when this occurs, the steel becomes brittle and can break more easily (c) so another action/process is required called tempering.
Examples of how materials change form then break when forces are applied:
(a) Very ductile, soft metals (e.g. Pb (lead), Au (gold) at room temperature
(b) Moderately ductile fracture, typical metals hardened and unhardened with variable carbon content below 0.8%
(c) Brittle fracture, cold hardened metals with high carbon content and ceramics.
Take silver steel as an example;

How can I check for correct hardness?

At this hardness rating, the silver steel is very hard. A quick and easy test to see if you have achieved this level of hardness is to try and file the silver steel after quenching. The file will ‘skid’ over the surface and will not cut into it. This is due to crystalisation of the steel.

Crystalisation occurs as a result of the heating and quenching process. The crystals within the steel contract (shrink) and bunch together really tightly, making the steel much harder than before.
How can I check for correct hardness?

If the steel is hardened but not tempered properly, failure can occur due to the internal structure of the metal becoming too crystalised, making it too brittle.
Getting the steel to the right temperature prior to quenching and then re-heating to the correct temperature for tempering is extremely important to prevent failure.

Slight temperature changes will result in different crystalisation properties of the steel. If it is cooled too rapidly it will become harder and therefore more brittle.
If it is cooled too slowly, it will become softer. Experimenting with test-pieces is a good way of seeing if the process you are using is fit for purpose.
Annealing

Due to it becoming harder and more brittle through hardening, the steel is annealed. Depending on what its final use will be, determines the annealing process.

Clean the steel. This removes the quenching fluid and prepares the steel for annealing. If a liquid other than water was used to quench the steel, water may be used to rinse the steel off. If water doesn’t remove coolant deposits, a light abrasive, such as emery cloth, may be used to do so.

The temperature to which the steel is heated during annealing determines how hard the steel will be; the higher the temperature, the softer but tougher it will be.

Heat the steel again to the desired temperature (approx. 780 degrees C). This second heating anneals the steel to take away the brittleness created by the hardening process. It does this by removing internal stresses and governs the level of hardness and brittleness for which the steel is set. The steel is cooled at a slower rate than quenching in water or oil as done earlier in the hardening process.
This can be done by immersing in a bucket of sand, or by allowing to cool at room temperature.
Tempering

Once hardened then annealed, the steel (knife blade in this example) is tempered by re-heating once more but not to the temperatures as with hardening and annealing. The localised area (such as the blade of this knife) is re-heated to a blue-grey colour.

During the tempering process, the heated steel shows surface oxide colours according to how hot it is. Colours start with light straw at about 200 degrees C through to purple at about 300 degrees C.
These colours are used as a guide for the tempering temperature according to how the steel will be used. However, alloyed steels (steels with 2 or more metals) require higher temperatures to reach a particular colour than plain carbon steels (steels made up of non-metalic elements).

The steel is then left to cool at room temperature. Further heating must be avoided as this will revert you back to the hardening/annealing process!

Let the steel (a chisel in this example) cool. This time, unlike the rapid cooling during quenching, the steel can be cooled either quickly or slowly, depending on the desired properties (cooling too quickly will make the chisel blade in this instance too brittle, so it needs to be cooled very slowly to make it softer and tougher).
Steel alloys subject to becoming brittle again after tempering should only be cooled slowly.
Once cooled, the workpiece is ready to be finally worked on, such as sharpening the blade area on a knife and cleaning/polishing it to its finished state.
History of Hardening Steel
Some methods of cooling (tempering) steels a few hundred years ago…
1. Covering with clay and charcoal ash (mainly used in knife and sword making).
2. Sticking the steel in animal carcasses (true!).
3. Even the good old spud (potato) was used! First use of tempering with potatoes originated in Ireland (according to records). The potato has a high carbon content which helped re-introduce carbons into the steel as it was cooling, so was surprisingly effective when tempering smaller pieces of steel. Is it possible to quench AND temper at the same time?……it is if you use the good ol’ spud!